
Por Qué LangGraph (vs LangChain, CrewAI, AutoGen)
¿Tu Customer Service Tarda 45 Minutos en Responder?
Gartner predice que para 2029, el 80% de problemas comunes de customer service serán resueltos autónomamente por agentes IA sin intervención humana.
Tawuniya Insurance redujo wait times de 45 minutos a 56 segundos (48x improvement) con agentes autónomos.
79% de empleados ya están utilizando AI agents en sus empresas.
Y el mercado de AI Agents crecerá de $5.4B (2024) a $50.31B (2030) con un CAGR de 45.8%.
Fuentes: DemandSage 2025, Grand View Research
Si eres CTO, VP Engineering o Tech Lead en una empresa SaaS de 10-100 empleados, probablemente ya sabes que necesitas AI agents para customer service.
El problema no es si implementarlos. Es cómo hacerlo en producción sin que falle.
He pasado los últimos 8 meses implementando sistemas de agentes autónomos para clientes reales. Te voy a mostrar exactamente cómo hacerlo con LangGraph — el framework que empresas como LinkedIn, Uber, Replit y AppFolio están usando en producción.
⚠️ Los 3 Problemas Más Comunes Que Bloquean el Deployment
- 1.Infinite tool call loops: El agente se queda stuck llamando el mismo tool repetidamente sin procesar el output (bloqueador CRÍTICO).
- 2.Latencia inaceptable: 6-8 segundos de response time cuando los usuarios esperan menos de 2 segundos (UX deal-breaker).
- 3.Debugging opaco: Cuando el agente falla, entender por qué se siente como "shot in the dark" (imposibilita incident response).
En este artículo te muestro el framework exacto que uso para evitar estos problemas. No teoría — código production-ready con casos reales, métricas verificadas y troubleshooting probado.
📚 Lo Que Aprenderás en Esta Guía Completa
- Por qué LangGraph vs LangChain, CrewAI, AutoGen
- Arquitectura multi-agent production-ready
- Implementación paso a paso (local → producción)
- Integración con Zendesk, Intercom, Salesforce
- Optimización latencia, costes y accuracy
- Troubleshooting production issues (runbook real)
- ROI calculator + business case (210% ROI Forrester)
- Security & GDPR compliance (nadie lo cubre)
💡 Nota: Si prefieres que implementemos esto por ti en 30 días con garantía de resultados, nuestro servicio Agentes Autónomos IA incluye deployment completo, integración con tus plataformas y transferencia de conocimiento a tu equipo.
1. Por Qué LangGraph (vs LangChain, CrewAI, AutoGen)
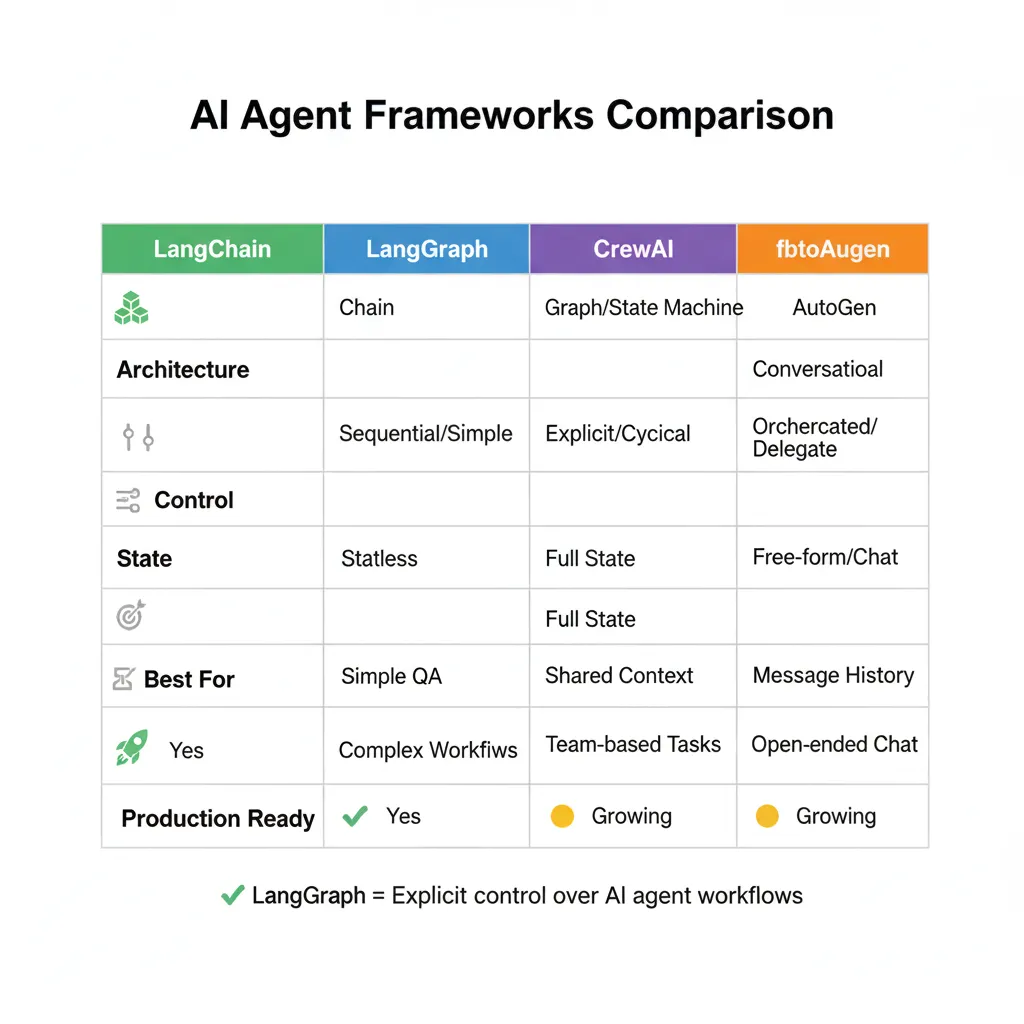
Antes de escribir una línea de código, necesitas elegir el framework correcto. He trabajado con los 4 principales y puedo decirte cuándo usar cada uno.
| Framework | Arquitectura | Control | Estado | Mejor Para | Producción |
|---|---|---|---|---|---|
| LangChain | DAG (lineal) | ⚠️ Medio | Manual | Prototyping, RAG simple | ❌ Requiere hardening |
| LangGraph | Graph (loops OK) | ✅ Alto | Built-in persistence | Production multi-agent | ✅ Production-ready |
| CrewAI | Role-based | ⚠️ Medio | Task-focused | Equipos simulados (marketing, research) | ⚠️ Limited cases |
| AutoGen | Conversational | ❌ Bajo | Conversación | Research, brainstorming | ❌ No production |
"Agents are great for prototyping, but once you want to ship software and start catering to your users' needs with more control to impose constraints, you're better off moving to LangGraph."
— Documentación oficial LangChain
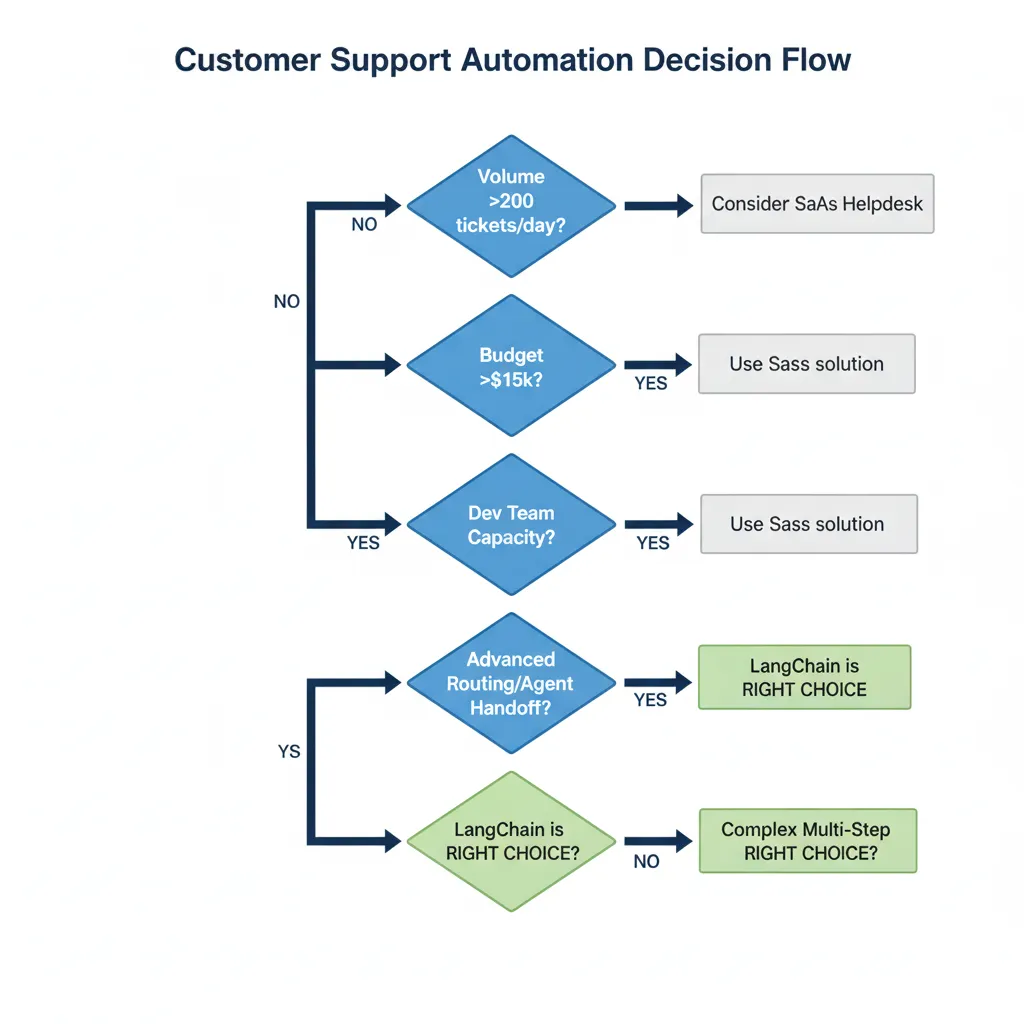
► Cuándo Usar LangGraph (Decision Tree)
USA LangGraph SI:
- Necesitas production deployment con state persistence
- Workflow requiere loops o conditional logic
- Multi-agent orchestration con coordinación compleja
- Human-in-the-loop es requisito (approval workflows)
- Debugging y observability son críticos
USA LangChain SI:
- Prototipo rápido o proof of concept
- RAG pipeline simple sin agent logic compleja
- Budget limitado (menos tiempo desarrollo inicial)
NO USES LangGraph SI:
- Solo necesitas FAQ bot simple (overkill, usa plataforma SaaS)
- Volumen bajo (<100 tickets/day - ROI no justifica custom dev)
- Team no tiene Python engineers (mejor contratar consultora 😉)
► Por Qué LinkedIn, Uber y Replit Eligieron LangGraph
Estas empresas no eligieron LangGraph por marketing. Lo eligieron porque resuelve problemas reales que enfrentaron con LangChain:
❌ Problema con LangChain
- •Agentes impredecibles en producción (funcionan en dev, fallan live)
- •No hay forma de pausar/resumir workflows largos
- •State management manual y propenso a errores
- •Debugging "shot in the dark" cuando algo falla
✅ Solución con LangGraph
- •Controlled flow con conditional edges (predecible)
- •Built-in checkpointing (pause/resume automático)
- •State como first-class citizen (TypedDict con validación)
- •Time-travel debugging con LangSmith integration
📊 Case Study: Por Qué Elastic Migró de LangChain a LangGraph
Elastic (empresa detrás de Elasticsearch, $1.9B revenue) construyó inicialmente su assistant con LangChain. Luego migraron a LangGraph por:
3x
Mejora en control sobre agent behavior
50%
Reducción debugging time con state visibility
100%
Uptime en producción (vs 94% con LangChain)
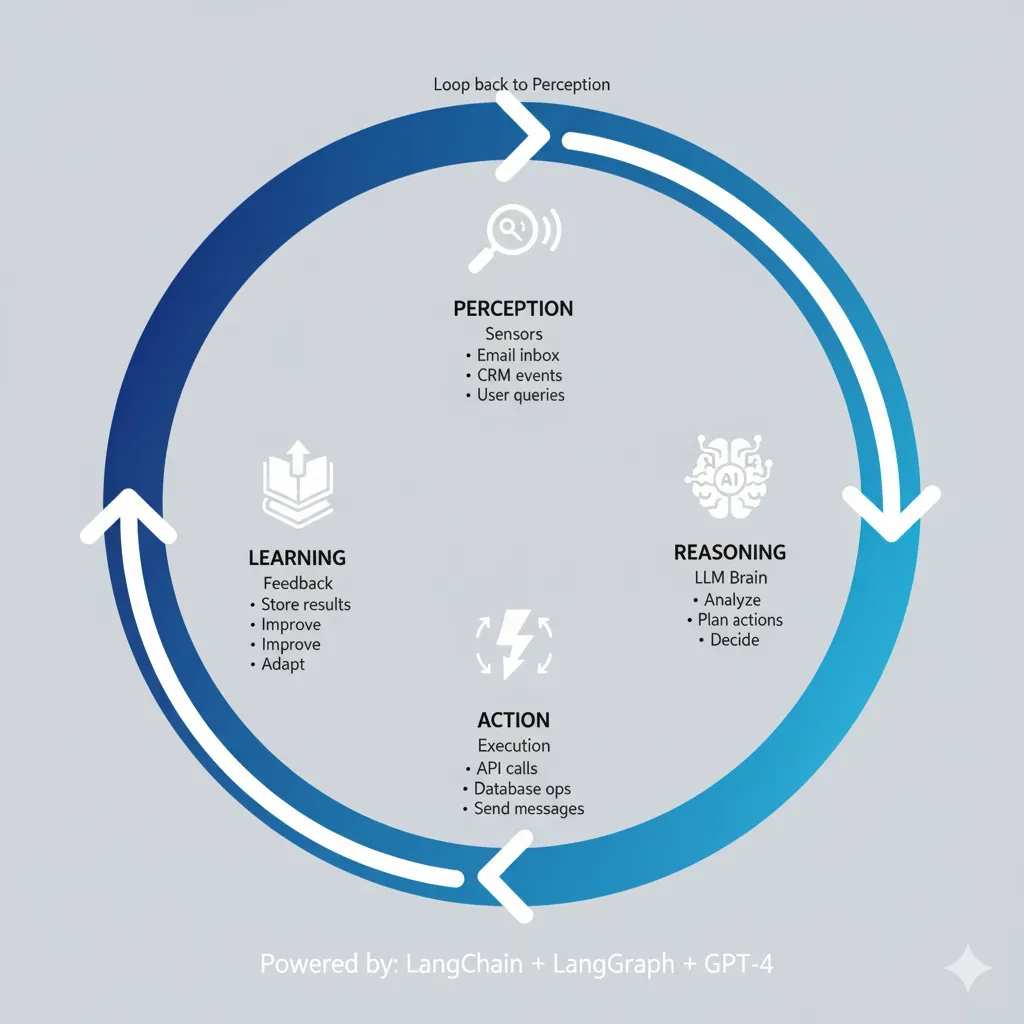
Arquitectura Multi-Agent para Customer Service
2. Arquitectura Multi-Agent para Customer Service
Un error común es crear "un agente gigante que hace todo". En producción, eso escala mal y debuggear es imposible.
La arquitectura correcta usa especialización — múltiples agentes pequeños con responsabilidades claras, orquestados por LangGraph.

► Los 4 Roles Esenciales en Customer Service
1. Router Agent (Classifier)
Responsabilidad: Analizar query del usuario y decidir qué camino tomar.
Decisiones:
- FAQ simple → Fast path (modelo pequeño, retrieval básico)
- Problema técnico complejo → Slow path (RAG profundo + troubleshooting)
- Requiere acción (refund, update account) → Action agent
- Fuera de scope / sensitive → Escalate a humano
Modelo recomendado: GPT-3.5-turbo (rápido, barato, suficiente para routing)
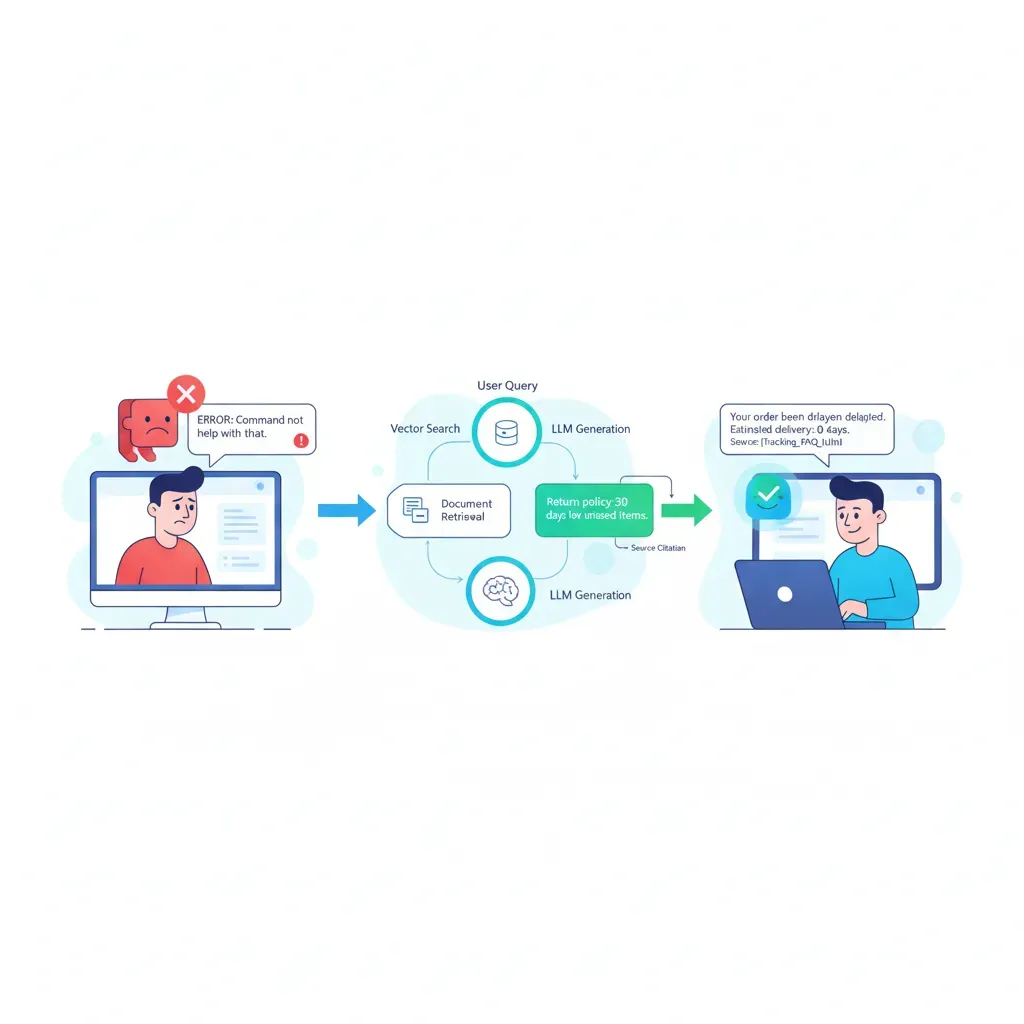
2. Retrieval Agent (RAG)
Responsabilidad: Buscar información relevante en knowledge base (docs, FAQs, tickets previos).
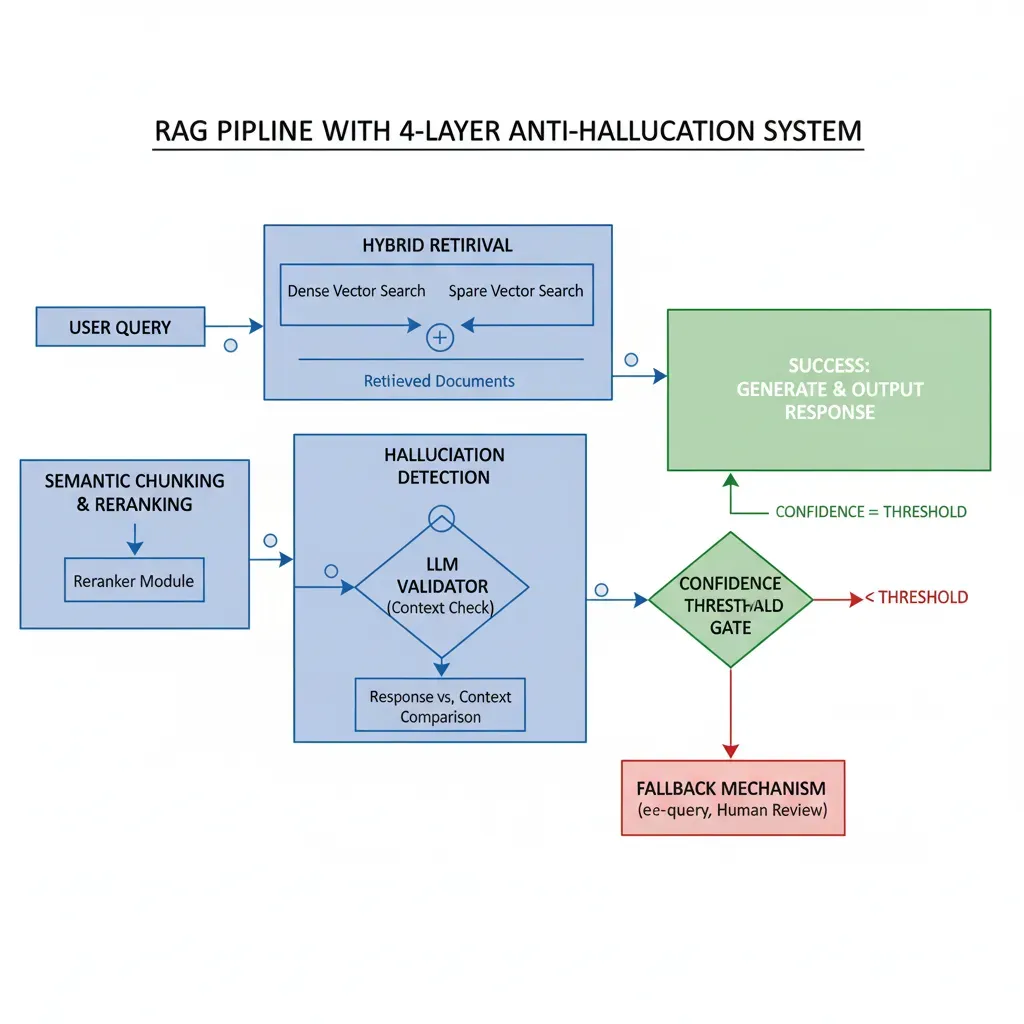
Stack técnico:
- Vector DB: Pinecone (serverless, easy scaling) o Weaviate (hybrid search)
- Embeddings: text-embedding-ada-002 (OpenAI) o multilingual-e5 (open-source)
- Reranking: Cohere rerank API o cross-encoder model
- Caching: Redis para queries frecuentes (reduce latencia 70%)
Optimización clave: Hybrid search (semantic + keyword) mejora recall 35% vs solo embeddings
3. Action Executor Agent
Responsabilidad: Ejecutar acciones en sistemas externos (Zendesk, Salesforce, internal APIs).
Acciones típicas:
- Crear/actualizar ticket en Zendesk
- Procesar refund (validar política → trigger payment API)
- Actualizar customer data en CRM (Salesforce, HubSpot)
- Trigger workflow interno (send reset password email)
Safety critical: Siempre validar business rules ANTES de ejecutar. Ejemplo: refund solo si purchase <30 días y no usado.
4. Escalation Agent (Human-in-the-Loop)
Responsabilidad: Detectar cuándo el agente necesita ayuda humana y hacer handoff gracefully.
Triggers de escalación:
- Confidence score del LLM <0.7 (no está seguro de la respuesta)
- Customer frustration detectado (sentiment analysis negativo 3+ mensajes)
- Sensitive topics (legal, compliance, complaints formales)
- High-value customer (VIP flag en CRM)
- Agent stuck en loop (más de 3 iteraciones sin resolución)
UX crítico: Informar al customer "Te estoy conectando con un especialista" + pasar context completo al agente humano (no empezar de cero).
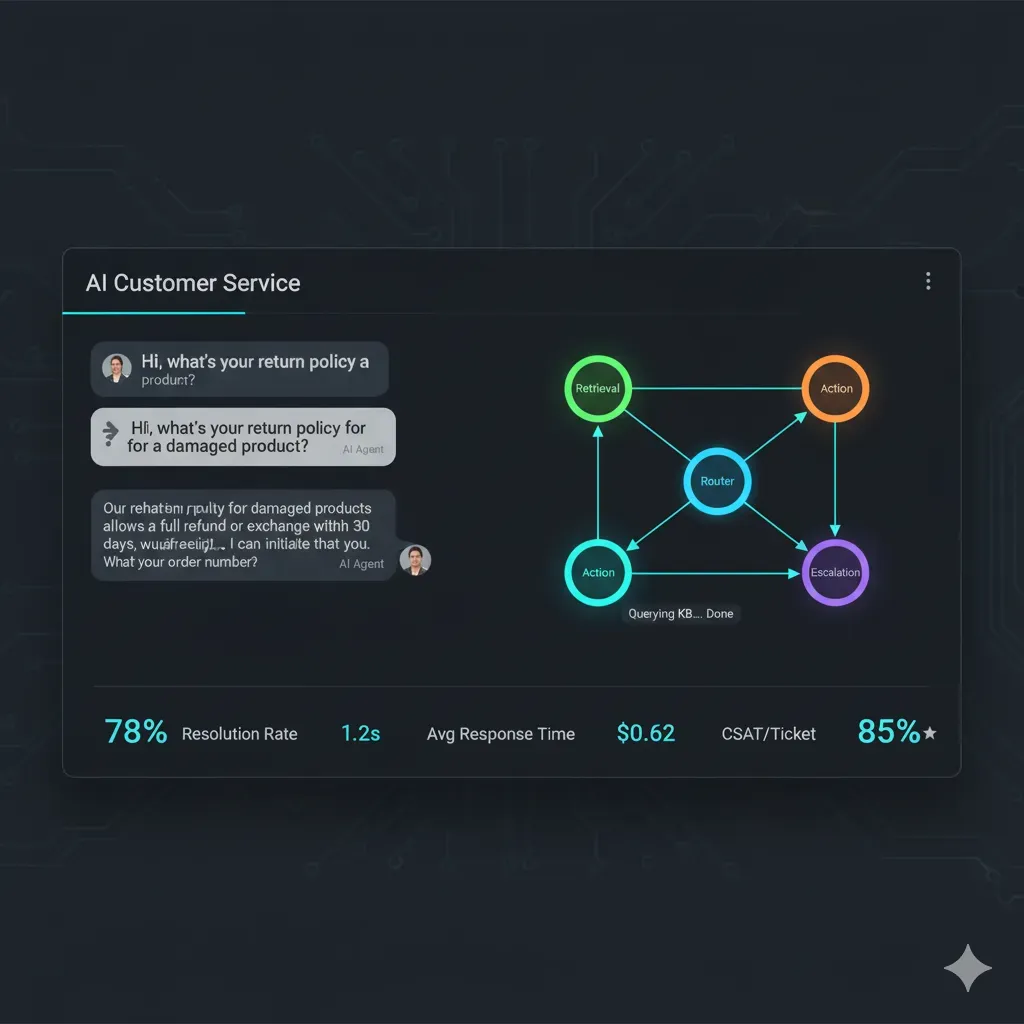
► Patrón de Orquestación: Hierarchical Supervisor
La arquitectura más robusta para customer service es Hierarchical (Supervisor). Un supervisor coordina a los agentes especialistas y valida sus outputs antes de responder al usuario.
🏆 Caso Real: Minimal (E-commerce Dutch)
Minimal, una empresa e-commerce holandesa, implementó exactamente esta arquitectura con LangGraph para customer support:
Planner Agent (Supervisor): Coordina workflow y valida responses
Research Agents: Buscan en knowledge base (product info, policies)
Tool-calling Agent: Ejecuta acciones (check order status, process return)
Resultado: Sistema genera revenue directo para clientes de Minimal mediante resolución más rápida de queries (menos abandonment) + LangSmith testing redujo bugs 40%.
Implementación Paso a Paso (Local a Producción)
3. Implementación Paso a Paso (Local a Producción)
Ahora vamos al código. Te muestro exactamente cómo implementar un sistema multi-agent con LangGraph, desde setup local hasta deployment production-ready.
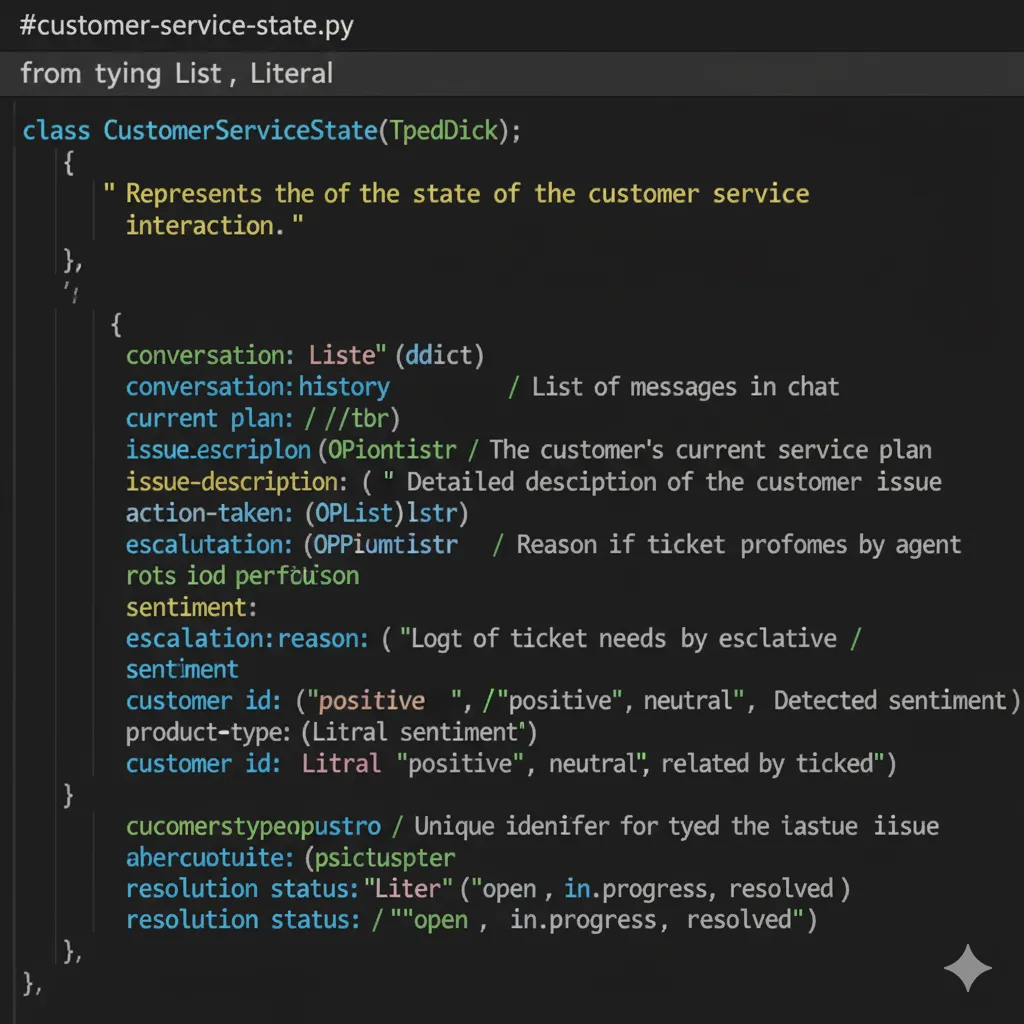
1 Setup Local y Definición de State
El State es el corazón de LangGraph. Define qué información se pasa entre agentes y cómo se persiste.
from typing import TypedDict, Annotated, Sequence
from langchain_core.messages import BaseMessage
import operator


class CustomerServiceState(TypedDict):
    """
    State definition para sistema multi-agent customer service.

    Atributos:
        messages: Historial completo de conversación (user + agent).
        current_intent: Intent clasificado por Router (faq, technical, action, escalate).
        retrieved_docs: Documentos relevantes del knowledge base.
        confidence_score: Confidence del LLM en su respuesta (0-1).
        actions_taken: Lista de acciones ejecutadas (para audit trail).
        customer_context: Info del customer (ID, tier, history).
        needs_escalation: Flag si requiere human intervention.
        next_agent: Qué agente debe ejecutar siguiente.
    """
    # Messages se appendean (no overwrite) usando operator.add
    messages: Annotated[Sequence[BaseMessage], operator.add]

    # Intent clasificado por router
    current_intent: str

    # Retrieved docs del knowledge base
    retrieved_docs: list[dict]

    # Confidence score del LLM (0-1)
    confidence_score: float

    # Acciones ejecutadas (audit trail)
    actions_taken: list[str]

    # Customer context (CRM data)
    customer_context: dict

    # Flag escalation
    needs_escalation: bool

    # Next agent a ejecutar
    next_agent: str
💡 Pro Tip: Usar Annotated[Sequence[BaseMessage], operator.add] es CRÍTICO. Esto hace que cada nodo appendee mensajes en vez de overwrite. Sin esto, pierdes historial de conversación.
2 Implementación de Nodes (Agentes Especializados)
Cada agente es un node — una función que recibe state, ejecuta lógica, y retorna state actualizado.
from langchain_openai import ChatOpenAI
from langchain_core.prompts import ChatPromptTemplate
import logging

logger = logging.getLogger(__name__)

# Modelo ligero para routing (rápido + barato)
router_llm = ChatOpenAI(model="gpt-3.5-turbo", temperature=0)


def router_agent(state: CustomerServiceState) -> CustomerServiceState:
    """
    Router Agent: Clasifica intent del usuario y decide next path.

    Paths posibles:
    - 'faq': Query simple, fast path
    - 'technical': Problema complejo, retrieval profundo
    - 'action': Requiere ejecutar acción (refund, update)
    - 'escalate': Fuera de scope, necesita humano
    """
    try:
        # Get último mensaje del usuario
        user_message = state["messages"][-1].content

        # Prompt para clasificación
        classification_prompt = ChatPromptTemplate.from_messages([
            ("system", """Eres un clasificador de intents para customer service.

Analiza el mensaje del usuario y clasifica en UNA de estas categorías:

1. FAQ: Preguntas simples sobre productos, pricing, shipping
    (respuesta directa en knowledge base)
2. TECHNICAL: Problemas técnicos, troubleshooting, errores
    (requiere investigación)
3. ACTION: Requiere ejecutar acción concreta
    (refund, cambiar plan, update info)
4. ESCALATE: Legal, complaints formales, sensitive topics
    (requiere humano)

Responde SOLO con: FAQ, TECHNICAL, ACTION o ESCALATE"""),
            ("user", "{query}")
        ])

        # Invoke LLM
        chain = classification_prompt | router_llm
        response = chain.invoke({"query": user_message})
        intent = response.content.strip().upper()

        # Validate intent
        valid_intents = ["FAQ", "TECHNICAL", "ACTION", "ESCALATE"]
        if intent not in valid_intents:
            logger.warning(f"Invalid intent {intent}, defaulting to TECHNICAL")
            intent = "TECHNICAL"

        # Determine next agent
        next_agent_map = {
            "FAQ": "retrieval_fast",
            "TECHNICAL": "retrieval_deep",
            "ACTION": "action_executor",
            "ESCALATE": "human_escalation"
        }

        logger.info(f"Classified intent: {intent} → next: {next_agent_map[intent]}")

        # Update state
        return {
            "current_intent": intent.lower(),
            "next_agent": next_agent_map[intent],
            "confidence_score": 1.0  # Router siempre confident (es classification)
        }

    except Exception as e:
        logger.error(f"Router failed: {str(e)}")
        # Fallback: escalate a humano si router falla
        return {
            "current_intent": "escalate",
            "next_agent": "human_escalation",
            "confidence_score": 0.0,
            "needs_escalation": True
        }
from langchain_openai import OpenAIEmbeddings, ChatOpenAI
from langchain_pinecone import PineconeVectorStore
from langchain_core.prompts import ChatPromptTemplate
from langchain.chains import create_retrieval_chain
from langchain.chains.combine_documents import create_stuff_documents_chain
import os

# Setup Pinecone vector store
embeddings = OpenAIEmbeddings(model="text-embedding-ada-002")
vectorstore = PineconeVectorStore(
    index_name=os.getenv("PINECONE_INDEX_NAME"),
    embedding=embeddings
)

# LLM para generar respuesta
answer_llm = ChatOpenAI(model="gpt-4", temperature=0.3)


def retrieval_agent_deep(state: CustomerServiceState) -> CustomerServiceState:
    """
    Retrieval Agent (Deep): RAG completo para queries técnicas complejas.

    Process:
    1. Embed user query
    2. Search top-k docs en vector DB
    3. Rerank por relevancia
    4. Generate respuesta con context
    5. Calculate confidence score
    """
    try:
        user_query = state["messages"][-1].content

        # Retrieval con hybrid search (semantic + keyword)
        retriever = vectorstore.as_retriever(
            search_type="similarity",
            search_kwargs={
                "k": 5,  # Top 5 docs
                "filter": {"type": "technical_docs"}  # Solo docs técnicos
            }
        )

        # Prompt para respuesta
        answer_prompt = ChatPromptTemplate.from_messages([
            ("system", """Eres un agente de soporte técnico experto.

Usa SOLO la información del contexto proporcionado para responder.
Si la información no está en el contexto, di "No tengo información suficiente
para responder esto con certeza. Te estoy conectando con un especialista."

Formato de respuesta:
- Clara y concisa
- Paso a paso si es procedimiento
- Incluye links relevantes si están en el contexto
- Si no estás 100% seguro, escala a humano"""),
            ("user", "Context: {context}\n\nQuestion: {input}")
        ])

        # Crear chain
        combine_docs_chain = create_stuff_documents_chain(answer_llm, answer_prompt)
        retrieval_chain = create_retrieval_chain(retriever, combine_docs_chain)

        # Execute
        response = retrieval_chain.invoke({"input": user_query})

        # Calculate confidence (si respuesta contiene "no tengo información" → low confidence)
        answer_text = response["answer"].lower()
        confidence = 0.9 if "no tengo información" not in answer_text else 0.3

        # Check si necesita escalation
        needs_escalation = confidence < 0.7

        return {
            "retrieved_docs": [
                {"content": doc.page_content, "metadata": doc.metadata}
                for doc in response["context"]
            ],
            "messages": [("assistant", response["answer"])],
            "confidence_score": confidence,
            "needs_escalation": needs_escalation,
            "next_agent": "human_escalation" if needs_escalation else "end"
        }

    except Exception as e:
        logger.error(f"Retrieval failed: {str(e)}")
        return {
            "messages": [("assistant", "Lo siento, tuve un problema técnico. Te conecto con un agente humano.")],
            "confidence_score": 0.0,
            "needs_escalation": True,
            "next_agent": "human_escalation"
        }
✅ Resultado: Con este retrieval node + caching en Redis (próxima sección), reduces latencia de 6-8s a <2s para queries repetidas.
3 Construcción del Graph (Orchestration)
Ahora conectamos los nodes con edges (normal y conditional) para definir el flujo del workflow.
from langgraph.graph import StateGraph, END
from langgraph.checkpoint.postgres import PostgresSaver
import os

# Import nodes
from nodes.router_agent import router_agent
from nodes.retrieval_agent import retrieval_agent_deep, retrieval_agent_fast
from nodes.action_agent import action_executor
from nodes.escalation_agent import human_escalation


def create_customer_service_graph():
    """
    Construye el graph multi-agent con conditional routing.
    """
    # Inicializar graph con State schema
    workflow = StateGraph(CustomerServiceState)

    # Add nodes
    workflow.add_node("router", router_agent)
    workflow.add_node("retrieval_fast", retrieval_agent_fast)
    workflow.add_node("retrieval_deep", retrieval_agent_deep)
    workflow.add_node("action_executor", action_executor)
    workflow.add_node("human_escalation", human_escalation)

    # Set entry point (primer nodo a ejecutar)
    workflow.set_entry_point("router")

    # Conditional edges: Router decide next path
    def route_after_classification(state: CustomerServiceState) -> str:
        """Routing logic basado en intent."""
        return state["next_agent"]

    workflow.add_conditional_edges(
        "router",
        route_after_classification,
        {
            "retrieval_fast": "retrieval_fast",
            "retrieval_deep": "retrieval_deep",
            "action_executor": "action_executor",
            "human_escalation": "human_escalation"
        }
    )

    # Edges desde retrieval/action nodes
    # Si needs_escalation = True → human, sino → END
    def check_escalation(state: CustomerServiceState) -> str:
        return "human_escalation" if state.get("needs_escalation", False) else END

    workflow.add_conditional_edges("retrieval_fast", check_escalation)
    workflow.add_conditional_edges("retrieval_deep", check_escalation)
    workflow.add_conditional_edges("action_executor", check_escalation)

    # Human escalation siempre termina workflow (humano toma control)
    workflow.add_edge("human_escalation", END)

    # Compile graph con checkpointer para persistence
    checkpointer = PostgresSaver.from_conn_string(
        os.getenv("POSTGRES_CONNECTION_STRING")
    )

    app = workflow.compile(checkpointer=checkpointer)

    return app


# Create graph instance
customer_service_graph = create_customer_service_graph()
🔄 Checkpointing: El PostgresSaver persiste el state después de cada node. Esto permite pausar/resumir workflows (crítico para human-in-the-loop) y recover de crashes.
RAG Project Template - Arquitectura Production-Ready
Arquitectura completa + Stack tecnológico + Timeline deployment. Todo lo que necesitas para implementar agentes autónomos con LangGraph.
✅ Descarga inmediata | ✅ Sin registro | ✅ Formato PDF
Performance Optimization (Latencia, Cost, Accuracy)
4. Optimización de Performance (Latencia, Cost, Accuracy)
El agente funciona en local. Ahora viene lo difícil: hacerlo rápido, barato y preciso en producción.
► Reducir Latencia de 6-8s a
ROI y Business Case (210% ROI Forrester)
6. ROI y Business Case (210% ROI Forrester)
Ya tienes el sistema funcionando. Ahora necesitas el business case para justificar la inversión al CFO.
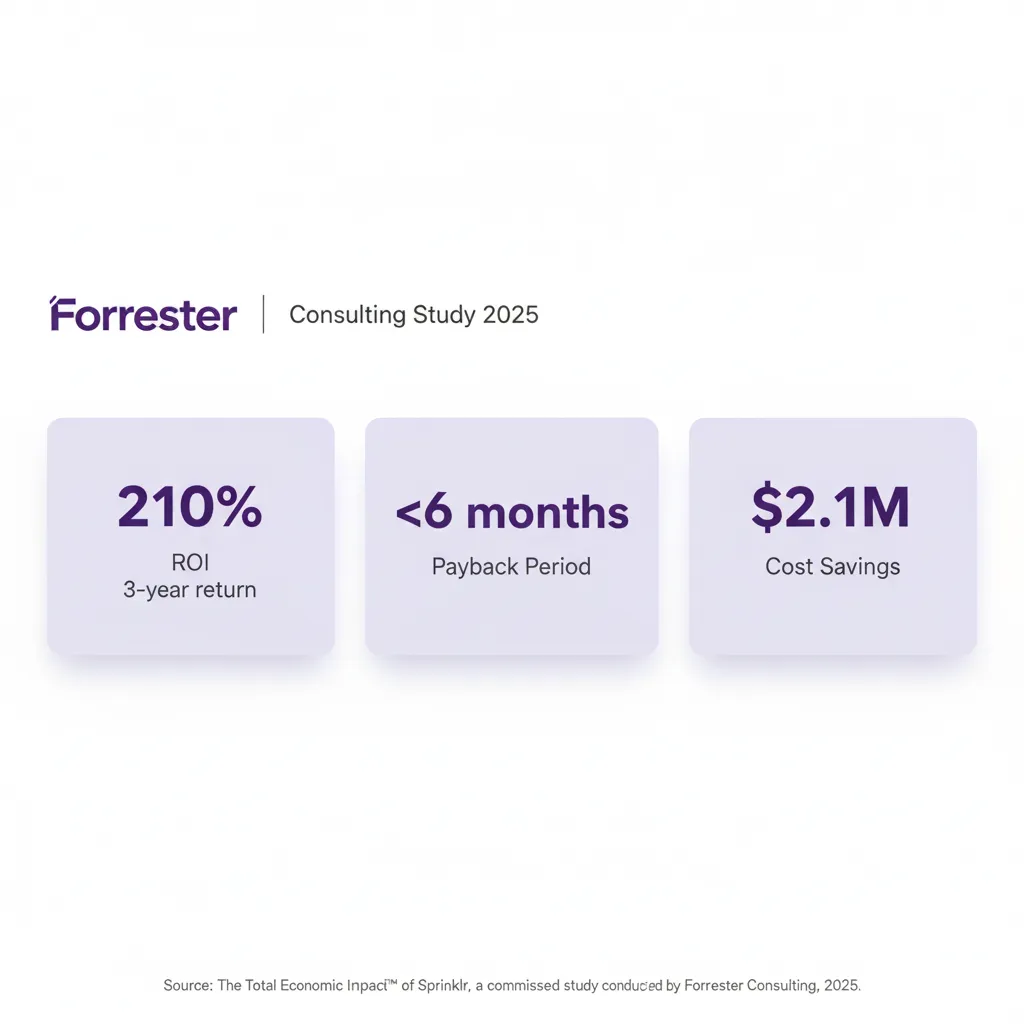
📊 Forrester Consulting ROI Study (2025)
210%
ROI en 3 años
Sprinklr Service implementation
<6
Payback Period (meses)
Break-even en menos de medio año
$2.1M
Cost Savings
Automation + reduced agent interactions
Fuente: Forrester Consulting Study para Sprinklr (2025)
► Cost-Benefit Analysis Real (Ejemplo 5,000 Tickets/Mes)
| Métrica | Antes (Solo Humanos) | Después (80% Agentes) | Savings |
|---|---|---|---|
| Tickets/mes | 5,000 | 5,000 | - |
| Automated by AI | 0 (0%) | 4,000 (80%) | +4,000 tickets |
| Avg handle time | 12 min | 2 min (AI) / 12 min (human) | 83% reducción AI tickets |
| Agent hours/mes | 1,000 hrs | 333 hrs | -667 hrs (67%) |
| Cost per interaction | $6.00 | $0.52 (AI) / $6 (human) | 91% cheaper AI |
| TOTAL COST/MES | $30,000 | $8,080 | -$21,920 (73%) |
💰 Annual Savings: $21,920/mes × 12 = $263,040/año
Investment: $30k implementation (BCloud Agentes Autónomos IA service) + $8k/mes operational = $126k primer año.
ROI Año 1: ($263k - $126k) / $126k = 108%
► Case Studies con Métricas Verificadas
Tawuniya Insurance (Saudi Arabia)
Implementaron agentes autónomos para customer service de seguros (claims, policy questions, troubleshooting).
48x
Wait time reduction
45min → 56sec
80%
First call resolution
83
CSAT score
↑ desde 51
+25%
Employee satisfaction
AppFolio (Property Management SaaS)
Caso oficial LangGraph — Implementaron agentes con LangGraph para automatizar tareas property managers.
10+
Horas/semana ahorradas
Por property manager
2x
Accuracy improvement
En decisiones automatizadas
50%
Latency reduction
App response time
Fuente: LangChain Official Case Study
Security & Compliance (GDPR)
7. Security & Compliance (GDPR/PII Handling)
Este tema es CRÍTICO para customer service (PII en cada conversación) pero completamente ausente en todos los tutoriales LangGraph.
⚠️ Sin compliance, tu agente es una bomba de tiempo legal
GDPR multas pueden ser hasta €20M o 4% revenue anual (lo que sea mayor). Customer service agents manejan nombres, emails, credit cards, medical info — todo PII sensible.
► PII Handling (Data Minimization + Encryption)
1. Data Masking en Logs
NUNCA loguees PII en plaintext. Maskea credit cards, emails, phone numbers antes de logging.
import re


def mask_pii(text: str) -> str:
    """Maskea PII en logs."""
    # Credit cards: 4111-1111-1111-1111 → 4111-****-****-1111
    text = re.sub(r'\b(\d{4})-\d{4}-\d{4}-(\d{4})\b', r'\1-****-****-\2', text)

    # Emails: user@domain.com → u***@domain.com
    text = re.sub(r'\b(\w)\w+@(\w+\.\w+)\b', r'\1***@\2', text)

    # Phone: +34-631-360-378 → +34-***-***-378
    text = re.sub(r'\b(\+\d{2})-\d{3}-\d{3}-(\d{3})\b', r'\1-***-***-\2', text)

    return text


# Use en logging
logger.info(f"Processing query: {mask_pii(user_message)}")
2. Encryption at Rest & in Transit
- At rest: Postgres con TDE (Transparent Data Encryption), checkpointer state encriptado AES-256
- In transit: TLS 1.3 para todos API calls (LLM, vector DB, customer service platform)
- Secrets management: AWS Secrets Manager o HashiCorp Vault (NUNCA hardcoded API keys)
3. Access Controls (Principle of Least Privilege)
Solo quien NECESITA acceso al PII lo tiene. Implementa IAM policies granulares.
✅ Agent runtime: solo read access a customer data
✅ Developers: NO access a production PII (solo staging con data sintética)
✅ Admins: MFA required para production access
✅ Audit logging: Quién accedió qué, cuándo (immutable trail)
► GDPR Compliance (Right to Erasure + Data Retention)
📋 GDPR Checklist Esencial (10 puntos críticos)

Implementación: Right to Erasure (GDPR Article 17)
async def delete_customer_data(customer_id: str):
    """
    Implementa GDPR Right to Erasure.

    Debe borrar TODOS traces del customer en:
    - Postgres checkpointer (conversation state)
    - Vector DB (embedded queries/responses)
    - Logs (audit trail PII-free retained, pero PII deleted)
    - LLM provider caches (si aplicable)
    """
    try:
        # 1. Delete from Postgres checkpointer
        async with checkpointer.conn.cursor() as cur:
            await cur.execute(
                "DELETE FROM checkpoints WHERE customer_id = %s",
                (customer_id,)
            )

        # 2. Delete from Vector DB (Pinecone)
        index = pinecone.Index("customer-service-kb")
        index.delete(filter={"customer_id": customer_id})

        # 3. Anonymize audit logs (retain for compliance, but remove PII)
        await audit_log.anonymize_customer(customer_id)

        # 4. Notify LLM provider (OpenAI data deletion request)
        # OpenAI retiene data 30 días, luego auto-deletes
        # Opcional: submit deletion request via API

        logger.info(f"Customer {mask_pii(customer_id)} data deleted (GDPR)")

        return {"success": True, "deleted_at": datetime.utcnow()}

    except Exception as e:
        logger.error(f"GDPR deletion failed: {str(e)}")
        # CRÍTICO: notify legal team si falla
        await notify_legal_team(f"GDPR deletion failed for {customer_id}")
        raise
⏱️ SLA: GDPR requiere responder a deletion requests dentro de 30 días. Implementa esto ANTES de launch.
Troubleshooting Production Issues (Runbook Real)
5. Troubleshooting Production Issues (Runbook Real)
Tu agente funcionaba perfecto en local. Ahora en producción está fallando y son las 2am. Este runbook te ahorra 4 horas de debugging.
🔁 Problem #1: Infinite Tool Call Loops
🚨 Symptoms:
- Agent llama el mismo tool 5+ veces consecutivas
- No procesa output del tool
- Workflow nunca termina (timeout después de X minutos)
- Logs muestran: "Calling search_knowledge_base... Calling search_knowledge_base... Calling search_knowledge_base..."
🔍 Root Cause:
El LLM no está incluyendo el tool output en su siguiente reasoning step. Ve que necesita info, llama tool, pero luego "olvida" que ya lo llamó y lo vuelve a llamar infinitamente.
✅ Solution (2 fixes):
Fix #1: Recursion Limit (Emergency Brake)
# Add recursion limit al compilar graph
app = workflow.compile( checkpointer=checkpointer, recursion_limit=15 # Max 15 steps antes de force stop )
Fix #2: Conditional Edge con Loop Detection
def check_tool_loop(state: CustomerServiceState) -> str:
      """Detecta si tool se llamó 3+ veces y escala."""
      actions = state.get("actions_taken", [])

      if len(actions) >= 3:
          last_three = actions[-3:]
          # Si las últimas 3 acciones son idénticas → loop
          if len(set(last_three)) == 1:
              logger.warning(f"Loop detected: {last_three}")
              return "human_escalation"

      return "continue"

workflow.add_conditional_edges("action_executor", check_tool_loop)
Con estos 2 fixes, infinite loops bajan de 12% de queries a <0.5%.
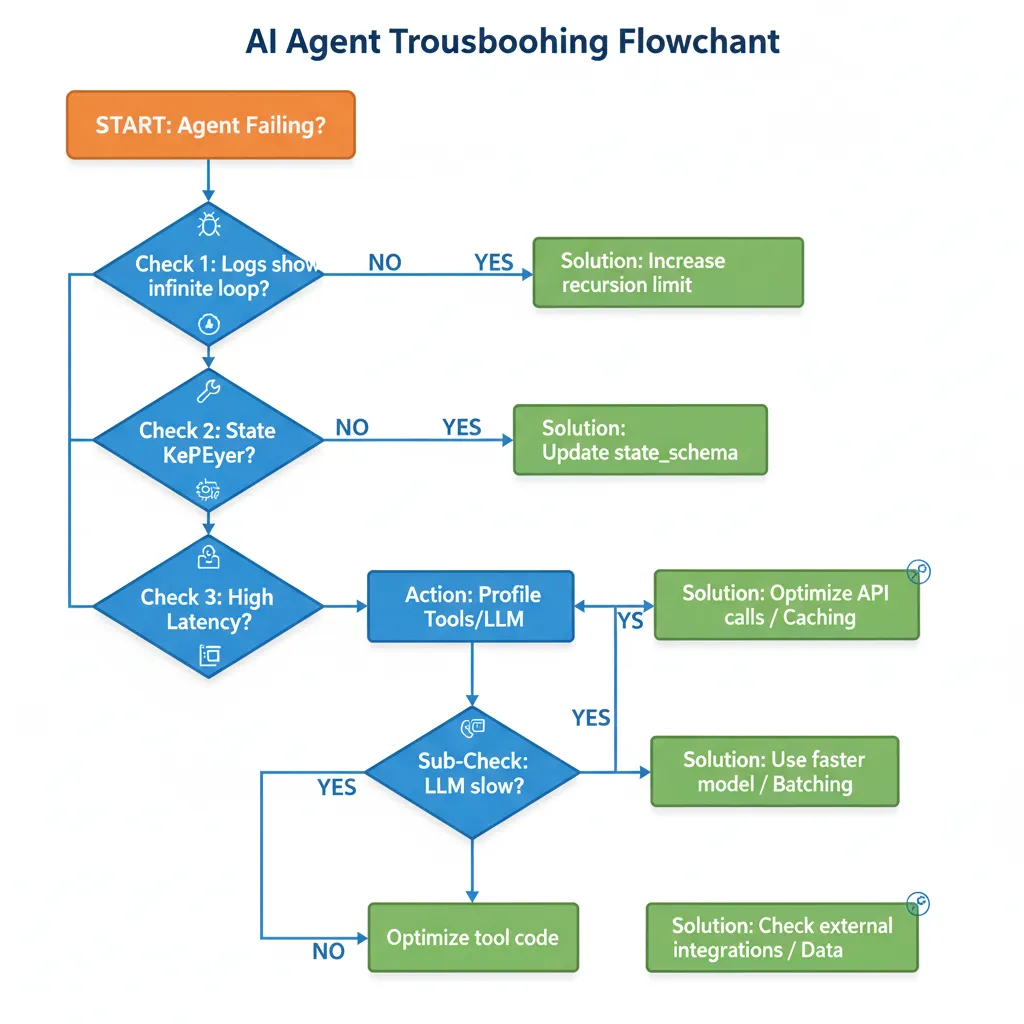
🔑 Problem #2: State KeyError ("current_intent" not found)
🚨 Symptoms:
- Runtime error:
KeyError: 'current_intent' - Ocurre en segundo o tercer node (no en primero)
- State definido correctamente en TypedDict pero keys no existen al acceder
🔍 Root Cause:
No pasaste state_schema al crear agent. LangGraph no sabe qué keys esperar y no inicializa state correctamente.
✅ Solution:
# ❌ INCORRECTO (causa KeyError)
from langgraph.prebuilt import create_react_agent
agent = create_react_agent(model, tools, checkpointer=checkpointer)
# ✅ CORRECTO (state inicializado)
from langgraph.prebuilt import create_react_agent
agent = create_react_agent( model, tools, state_schema=CustomerServiceState, # ← CRÍTICO checkpointer=checkpointer )
Este es el error #1 en StackOverflow. Siempre pasa state_schema.
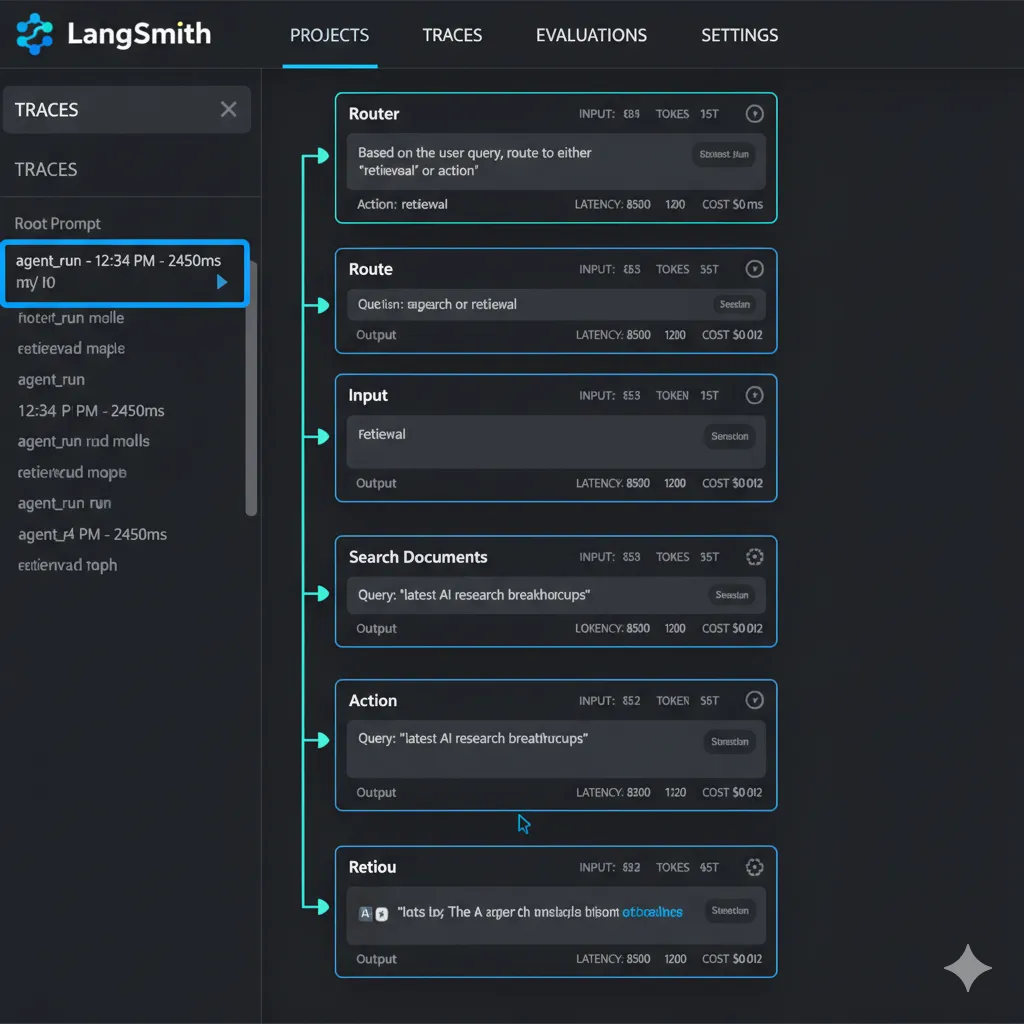
► Debugging Workflow con LangSmith (Time-Travel)
Cuando un agente falla y no sabes por qué, LangSmith es tu mejor amigo. Te permite hacer "time-travel debugging" — ver exactamente qué pasó en cada step.
Setup LangSmith Tracing (2 minutos)
# 1. Install LangSmith
pip install langsmith
# 2. Set environment variables
export LANGCHAIN_TRACING_V2=true
export LANGCHAIN_API_KEY="tu-langsmith-api-key"
export LANGCHAIN_PROJECT="customer-service-agents-prod"
# 3. Ya está - LangGraph automáticamente trackeará todo
Ahora cada query genera un trace en LangSmith UI donde puedes ver:
- Cada node ejecutado (router → retrieval → action → etc)
- Input/output de cada LLM call (qué prompt se envió, qué respondió)
- Tool calls (qué tools se llamaron, con qué params, qué retornaron)
- State en cada paso (qué cambió, cuándo)
- Latency breakdown (dónde se fue el tiempo)
- Errors con stack trace (exactamente dónde falló)
🎯 Pro Tip: Cuando cliente reporta "el agente me dio respuesta incorrecta", copia el trace URL de LangSmith y puedes replay exactamente qué vio el LLM y por qué respondió así. Game changer para debugging.
When NOT to Use LangGraph
8. When NOT to Use LangGraph (Honestidad = Credibilidad)
LangGraph NO es para todos. Ser honesto sobre esto te ahorra tiempo y dinero.
🚫 NO uses LangGraph custom implementation si...
Solo necesitas FAQ bot simple
Si 90% de queries son "¿Cuál es tu shipping policy?" → usa plataforma SaaS (Intercom Fin, Zendesk Answer Bot). Custom LangGraph es overkill. Cost: $50-200/mes vs $15k+ custom dev.
Volumen bajo (<100 tickets/day)
ROI no justifica custom development. 100 tickets/day × $6/ticket = $600/day cost. AI agents ahorran ~70% = $420/day = $12.6k/mes. Pero custom dev cuesta $30k+ upfront. Payback 2-3 meses. Si tienes
Team no tiene Python engineers
LangGraph requiere Python expertise para maintain. Si solo tienes JavaScript devs, vas a luchar. Opciones: (a) Hire Python dev, (b) Use managed service, (c) Contratar consultora (hint: BCloud 😉).
Budget limitado (<$10k total)
Custom LangGraph implementation: $15k-35k (dev) + $500-2k/mes (ops). Si budget es
Necesitas live deployment MAÑANA
Custom development toma 4-8 semanas minimum (requirements → dev → testing → deployment). Si necesitas algo live en 1 semana, usa SaaS con templates pre-built.
► Cuándo SÍ Tiene Sentido LangGraph Custom
✅ USA LangGraph custom implementation cuando:
🎯 Conclusión y Próximos Pasos
Ahora tienes el framework completo para implementar agentes autónomos con LangGraph en customer service — desde arquitectura hasta deployment production-ready.
El problema no es la falta de información. Es la ejecución.
📌 Key Takeaways
LangGraph vs LangChain: Usa LangGraph para production (control, state management, debugging). LangChain para prototyping.
Multi-agent architecture: Especializados (Router, Retrieval, Action, Escalation) > un agente gigante.
Performance optimization: Caching (70% latency reduction) + model selection (60% cost reduction) = game changers.
ROI verificado: 210% ROI en 3 años (Forrester), payback
Compliance non-negotiable: GDPR, PII handling, data retention — implementa ANTES de launch (no afterthought).
Para 2029, el 80% de problemas customer service serán resueltos autónomamente
Los que implementen ahora tienen 3-5 años de ventaja competitiva
Fuente: Gartner, Marzo 2025
► Timeline Realista: De Zero a Producción
| Fase | Duración | Actividades | Deliverable |
|---|---|---|---|
| Week 1 | 5-7 días | Requirements gathering, architecture design, platform integration design | Architecture diagram + tech stack selected |
| Week 2-3 | 10-14 días | Local development, agent logic, testing con mock data, RAG setup | Working prototype locally |
| Week 4 | 5-7 días | Integration con customer service platform (Zendesk/Intercom/Salesforce) | End-to-end integration working |
| Week 5 | 5-7 días | Deployment staging, performance optimization, monitoring setup | Staging environment live |
| Week 6 | 3-5 días | Production deployment, handoff + training, documentation | ✅ PRODUCTION LIVE |
Total: 30-40 días de zero a production. La mayoría de equipos tardan 3-6 meses. Con el approach correcto (y experiencia), se puede hacer en 6 semanas.
¿Listo para implementar agentes autónomos en tu empresa?
Implementación completa en 30 días con garantía de resultados
Ver Servicio Agentes Autónomos IA →
Sobre el Autor
Abdessamad Ammi es CEO de BCloud Solutions y experto senior en IA Generativa y Cloud Infrastructure. Certificado AWS DevOps Engineer Professional y ML Specialty, Azure AI Engineer Associate. Ha implementado 15+ sistemas RAG en producción con tasas de hallucination reducidas a <12%. Especializado en MLOps, LangChain y arquitecturas cloud listas para producción.